docker-study
개요
Docker는 컨테이너 기반 가상화 도구이다.
Docker Architecture

Client : 도커 커맨드는 컨테이너를 조작하는 CLI로 도커 데몬의 클라이언트이다.
Daemon: 도커 데몬은 클라이언트인 도커 커맨드의 명령을 받아들여 도커 오브젝트인 이미지, 컨테이너, 볼륨, 네트워크 등을 관리한다.
Registry : 도커 Image가 저장되어 있는 장소이다. 대표적으로 Docker Hub가 있다. Registry는 Public Registry와 Private Registry가 있다.
Image : 도커 Daemon을 통해 Container로 실행 가능하도록 필요한 프로그램, 라이브러리, 소스 등이 설치된 파일이다.
컨테이너의 생명주기와 Docker Command
컨테이너는 이미지, 실행, 정지의 세 가지 상태를 가진다.
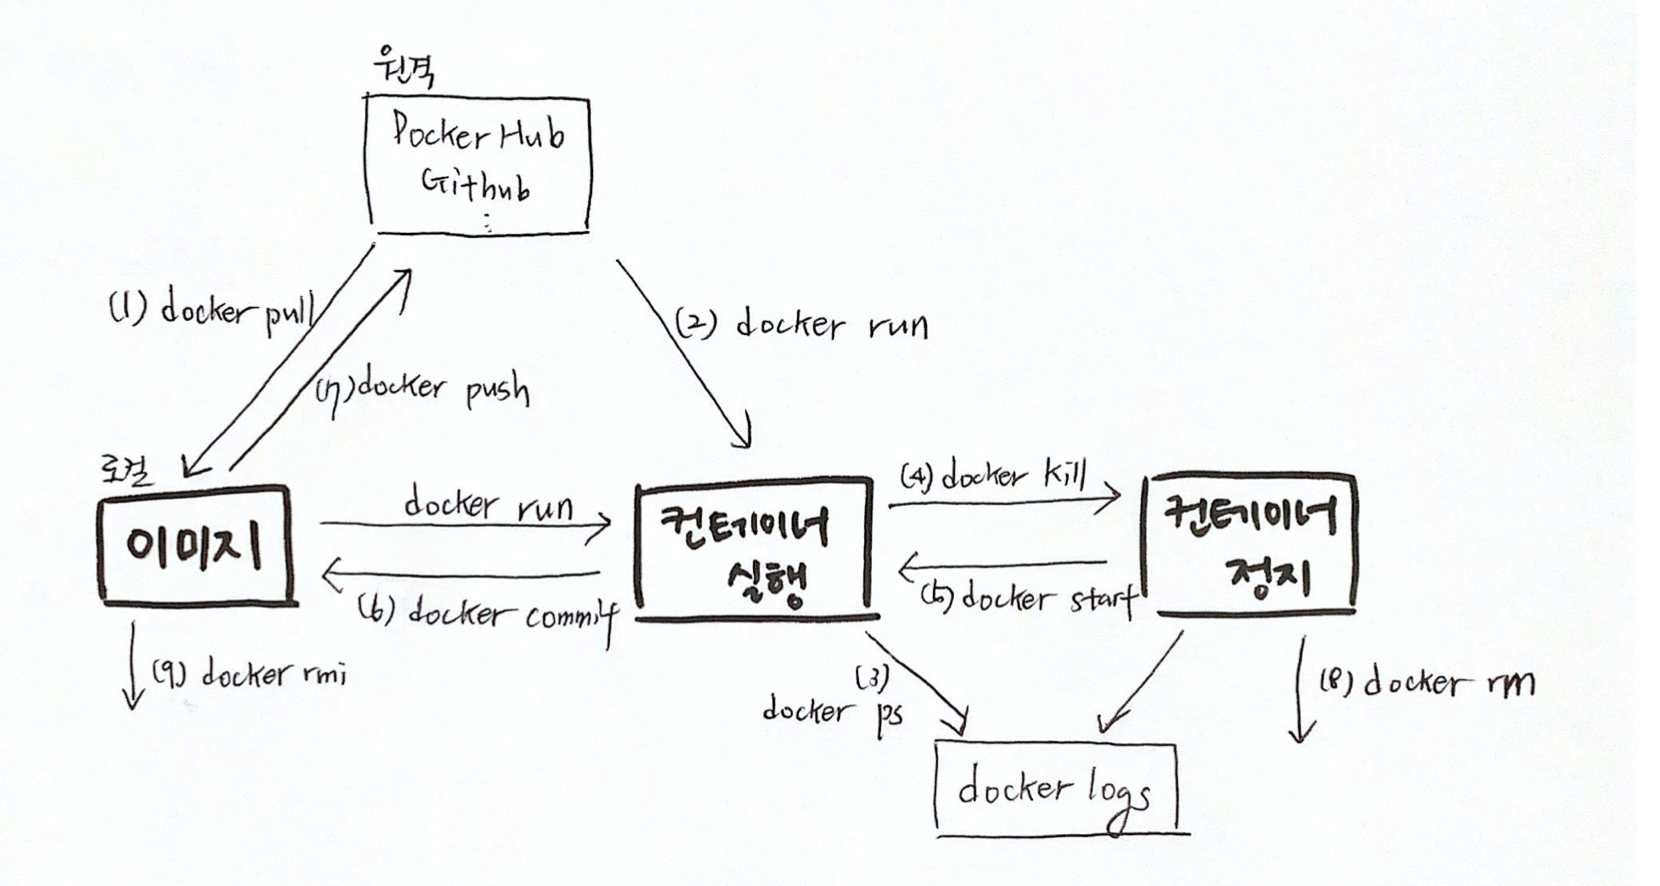
(1) 이미지 받기
docker pull 이미지이름:tag
$ docker pull nginx:latest
(2) 컨테이너 실행
docker run <옵션> 이미지이름:tag <커맨드> <인자>
$ docker run -it --name test1 nginx:latest /bin/sh
-it 옵션 : 이 두 옵션(-i, -t)은 컨테이너를 종료하지 않은체로, 터미널의 입력을 계속해서 컨테이너로 전달하기 위해서 사용.
–name : 컨테이너에 이름을 부여
-e : Docker 컨테이너의 환경변수를 설정. -e 옵션을 사용하면 Dockerfile의 ENV 설정도 덮어써진다.
-p : 호스트(host) 컴퓨터에서 컨테이너 내부 에서 리스닝하고 있는 포트로 접속할 수 있도록 설정.
-v, -mount : 호스트와 컨테이너 간의 볼륨(volumn) 설정. 호스트(host) 컴퓨터의 파일 시스템의 특정 경로를 컨테이너의 파일 시스템의 특정 경로로 마운트(mount)해줌.
-w: Dockerfile의 WORKDIR 설정을 덮어쓰기 위해서 사용
–entrypoint : Dockerfile의 ENTRYPOINT 설정을 덮어쓰기 위해서 사용
–rm : 컨테이너를 일회성으로 실행할 때 사용. 컨테이너가 종료될 때 컨테이너와 관련된 리소스(파일 시스템, 볼륨)까지 깨끗이 제거
(3) 컨테이너 상태 출력
$ docker ps
$ docker ps -a #정지된 컨테이너까지 확인
(4) 컨테이너 정지
- 커맨드를 지정하지 않고 컨테이너를 실행하면 실행하자마자 컨테이너의 PID=1인 프로세스가 종료된다.
❯ docker run ubuntu                                                  10:02:36
Unable to find image 'ubuntu:latest' locally
latest: Pulling from library/ubuntu
da7391352a9b: Pull complete
14428a6d4bcd: Pull complete
2c2d948710f2: Pull complete
Digest: sha256:c95a8e48bf88e9849f3e0f723d9f49fa12c5a00cfc6e60d2bc99d87555295e4c
Status: Downloaded newer image for ubuntu:latest
~ 11s ❯ docker ps                                                      10:02:55
CONTAINER ID   IMAGE     COMMAND   CREATED   STATUS    PORTS     NAMES
~ ❯ docker ps -a                                                       10:02:59
CONTAINER ID   IMAGE         COMMAND       CREATED         STATUS                     PORTS     NAMES
a0c540ee9a23   ubuntu        "/bin/bash"   9 seconds ago   Exited (0) 8 seconds ago             kind_kowalevski
- docker stop <컨테이너ID> | 컨테이너명
- docker kill <컨테이너ID> | 컨테이너명 (강제종료)
#실행된 프로세스와 터미널 상에서 입출력 주고받기위해
$ docker attach d3fef9c0f9e9
[root@d3fef9c0f9e9 /]#

#종료
[root@d3fef9c0f9e9 /]# exit

$ docker stop a0c540ee9a23
$ docker kill a0c540ee9a23
(5) 컨테이너 재기동
docker start <옵션> <컨테이너ID/name>
$ docker start a0c540ee9a23
(6) 컨테이너의 변경사항을 리포지터리에 저장
실행중인 컨테이너에도 필요한 패키지 설치나 업데이트를 할 수 있다. 이때 변경된 컨테이너의 상태를 이미지로 만들어 리포지터리에 보관할 수 있다.
❯ docker run -it centos:7 bash                                                                          10:25:09
[root@de188f9bdb03 /]# yum update -y
Loaded plugins: fastestmirror, ovl
Determining fastest mirrors
 * base: mirror.navercorp.com
 * extras: mirror.navercorp.com
 * updates: mirror.navercorp.com
<생략>
Complete!
[root@de188f9bdb03 /]# yum install -y git
Loaded plugins: fastestmirror, ovl
Loading mirror speeds from cached hostfile
 * base: mirror.navercorp.com
 * extras: mirror.navercorp.com
 * updates: mirror.navercorp.com
Resolving Dependencies
--> Running transaction check
<생략>
변경된 컨테이너 상태 저장
$ docker ps                                                                                                 10:29:48
CONTAINER ID   IMAGE      COMMAND   CREATED          STATUS          PORTS     NAMES
de188f9bdb03   centos:7   "bash"    21 seconds ago   Up 20 seconds             suspicious_euler
$ docker commit de188f9bdb03 centos:7-git
sha256:3f39901c8225f7763e4e6ca31149d99808733704354cfbc13b1ab58fa5be0c44
(7) docker push
$ docker push <이미지 이름>
(8) 컨테이너/이미지 삭제
$ docker rmi <이미지ID>
$ docker rm <컨테이너ID>

#모든 docker이미지 삭제
$ docker rmi $(docker images -q)

#종료된 모든 컨테이너를 삭제
$ docker rm $(docker ps -a -q)
(10) 실행중인 컨테이너에 접속(해당 컨테이너의 shell에 접속)
[hb0617@k8s-dev ~]$ docker exec -it hb-container sh
/workspace/test # ls
Dockerfile        go.sum            test1
go.mod            run_my_docker.sh  test1.go
Dockerfile
이미지를 직접 빌드하는 스크립트가 기재된 파일로서, 다음과 같은 내용을 담고있다.
- 베이스 이미지의 repository
- 설치할 패키지
- 소스코드와 설정파일
- 컨테이너 기동 시 실행될 명령어
Dockerfile 작성
Exmaple
FROM golang:alpine as builder

WORKDIR /workspace/test
COPY . .

RUN go get -d -v
RUN go build -o test1 test1.go

ENTRYPOINT ["/workspace/test/test1"]
CMD ["/workspace/test/test1"]
FROM : golang 이미지를 가져와서,
WORKDIR : 내 workspace로 이동 후
COPY : 이 위치에 copy 해주고
RUN : (이 위치에서) test1.go build를 통해 test1 이란 이름의 exe 바이너리 파일 생성
ENTRYPOINT, CMD : 컨테이너 실행과 동시에 명령어 실행
Dockerfile 작성법
FROM : 컨테이너의 베이스 이미지 지정
FROM <이미지>:<태그>
FROM golang:1.15
WORKDIR : Dockerfile 내부에서 사용되는 WORKDIR 명령은 작업용 디렉터리를 설정하기 위해 사용
WORKDIR /workspace/test
RUN : 컨테이너의 베이스 이미지에서 커맨드를 실행
RUN <커맨드>
RUN apt-get update && apt-get install -y vim apache2
COPY: 컨테이너 내부에 파일을 복사한다.
# 현재 index.html 파일을 /var/www/html/ 경로에 복사한다.
COPY index.html /var/www/html/

# 현재 위치의 모든 파일을, 현재위치 경로에 복사
COPY . .
ADD: ADD : COPY명령문과 비슷하나 일반 파일 뿐만 아니라 압축 파일이나 네트워크 상의 파일도 사용할 수 있다.
ADD index.html /var/www/html/
ADD . .
CMD : 이미지를 바탕으로 생성된 컨테이너 실행 시 매번 명령을 실행. (Docker run / Docker start)
참고로 하나의 CMD만 작성할 수 있으며, 중복일 경우 맨 마지막 하나만 유효하다.
CMD ["/workspace/test/test1"]
ENTRYPOINT : Dockerfile에서 빌드한 이미지를 컨테이너로 생성(Docker run)할때 단 한번만 실행.
ENTRYPOINT ["/workspace/test/test1"]
Dockerfile build 후 실행
$ docker build -t d3 .
$ docker run -it -p8888:1322 --name test01 d3 /bin/sh
위 내용을 shell script를 작성해서 편리하게 실행할 수도 있다.
run_my_docker.sh파일 작성
docker stop hb-container
docker rm hb-container
docker build -t hb-image .
docker run -it -p:8888:{컨테이너 포트} --name hb-container hb-image /bin/sh
실행
[hb0617@k8s-dev test]$ sh run_my_docker.sh
hb-container
hb-container
Sending build context to Docker daemon  10.24kB
Step 1/7 : FROM golang:alpine as builder
 ---> 1463476d8605
Step 2/7 : WORKDIR /workspace/test
 ---> Using cache
 ---> 372938087652
Step 3/7 : COPY . .
 ---> da837dd7def5
Step 4/7 : RUN go get -d -v
 ---> Running in 5248577d4c68
go: downloading github.com/labstack/echo v3.3.10+incompatible
go: downloading github.com/labstack/gommon v0.3.0
go: downloading golang.org/x/crypto v0.0.0-20201221181555-eec23a3978ad
go: downloading github.com/dgrijalva/jwt-go v3.2.0+incompatible
go: downloading github.com/valyala/fasttemplate v1.0.1
go: downloading github.com/mattn/go-colorable v0.1.2
go: downloading github.com/mattn/go-isatty v0.0.9
go: downloading github.com/valyala/bytebufferpool v1.0.0
go: downloading golang.org/x/sys v0.0.0-20191026070338-33540a1f6037
go: downloading golang.org/x/net v0.0.0-20190404232315-eb5bcb51f2a3
go: downloading golang.org/x/text v0.3.0
Removing intermediate container 5248577d4c68
 ---> 50cab91af847
Step 5/7 : RUN go build -o test1 test1.go
 ---> Running in d70e3b16e2b0
Removing intermediate container d70e3b16e2b0
 ---> 6edb127ed083
Step 6/7 : ENTRYPOINT ["/workspace/test/test1"]
 ---> Running in ad083a649d64
Removing intermediate container ad083a649d64
 ---> dccc62b63c21
Step 7/7 : CMD ["/workspace/test/test1"]
 ---> Running in f930476d6d23
Removing intermediate container f930476d6d23
 ---> 2e2a103a4daf
Successfully built 2e2a103a4daf
Successfully tagged hb/image:latest

   ____    __
  / __/___/ /  ___
 / _// __/ _ \/ _ \
/___/\__/_//_/\___/ v3.3.10-dev
High performance, minimalist Go web framework
https://echo.labstack.com
____________________________________O/_______
                                    O\
⇨ http server started on [::]:1322

^C[hb0617@k8s-dev test]$ docker ps
CONTAINER ID        IMAGE               COMMAND                  CREATED             STATUS              PORTS                    NAMES
10f3511a0914        hb-image            "/workspace/test/tes…"   9 seconds ago       Up 8 seconds        0.0.0.0:8888->1322/tcp   hb-container
Docker Registry
Docker image를 저장하는 저장소이다. 로컬에 저장할 수 있는 private 방식과 외부에 원격 저장할 수 있는 Pulic 방식이 존재한다.
- Private Registry는 개인 저장소라고도 하며 Docker hub에서 제공하는 registry 이미지를 사용 해 컨테이너에서 이미지를 로컬 저장하는 방식이다.
Registry 이미지 다운로드
$ docker image pull registry
다운받은 registry 이미지 실행
$ docker container run -d -p 5000:5000 --name
$ docker-registry registry
테스트용으로 hello-world 이미지 다운로드
$ docker pull hello-world
localhost 이미지 만들기
$ docker tag hello-world localhost:5000/hello-world
만들어진 이미지 push
$ docker push localhost:5000/hello-world
이제 기존의 이미지를 삭제하고 registry에서 가져 올 수 있다.
[hb0617@k8s-dev ~]$ docker images
REPOSITORY                                   TAG                 IMAGE ID            CREATED             SIZE
hello-world                                  latest              bf756fb1ae65        12 months ago       13.3kB
localhost:5000/hello-world                   latest              bf756fb1ae65        12 months ago       13.3kB

# 이미지 삭제
[hb0617@k8s-dev ~]$ docker rmi -f bf756fb1ae65
Untagged: hello-world:latest
Untagged: hello-world@sha256:1a523af650137b8accdaed439c17d684df61ee4d74feac151b5b337bd29e7eec
Untagged: localhost:5000/hello-world:latest
Untagged: localhost:5000/hello-world@sha256:90659bf80b44ce6be8234e6ff90a1ac34acbeb826903b02cfa0da11c82cbc042
Deleted: sha256:bf756fb1ae65adf866bd8c456593cd24beb6a0a061dedf42b26a993176745f6b
Deleted: sha256:9c27e219663c25e0f28493790cc0b88bc973ba3b1686355f221c38a36978ac63

# Registry 에서 방금 push한 이미지 pull
[hb0617@k8s-dev ~]$ docker image pull localhost:5000/hello-world
Using default tag: latest
latest: Pulling from hello-world
0e03bdcc26d7: Pull complete
Digest: sha256:90659bf80b44ce6be8234e6ff90a1ac34acbeb826903b02cfa0da11c82cbc042
Status: Downloaded newer image for localhost:5000/hello-world:latest
localhost:5000/hello-world:latest
이미지 확인하기
[hb0617@k8s-dev ~]$ curl -X GET http://localhost:5000/v2/_catalog
{"repositories":["hello-world"]}
태그 정보 확인하기
[hb0617@k8s-dev ~]$ curl -X GET http://localhost:5000/v2/hello-world/tags/list
{"name":"hello-world","tags":["latest"]}
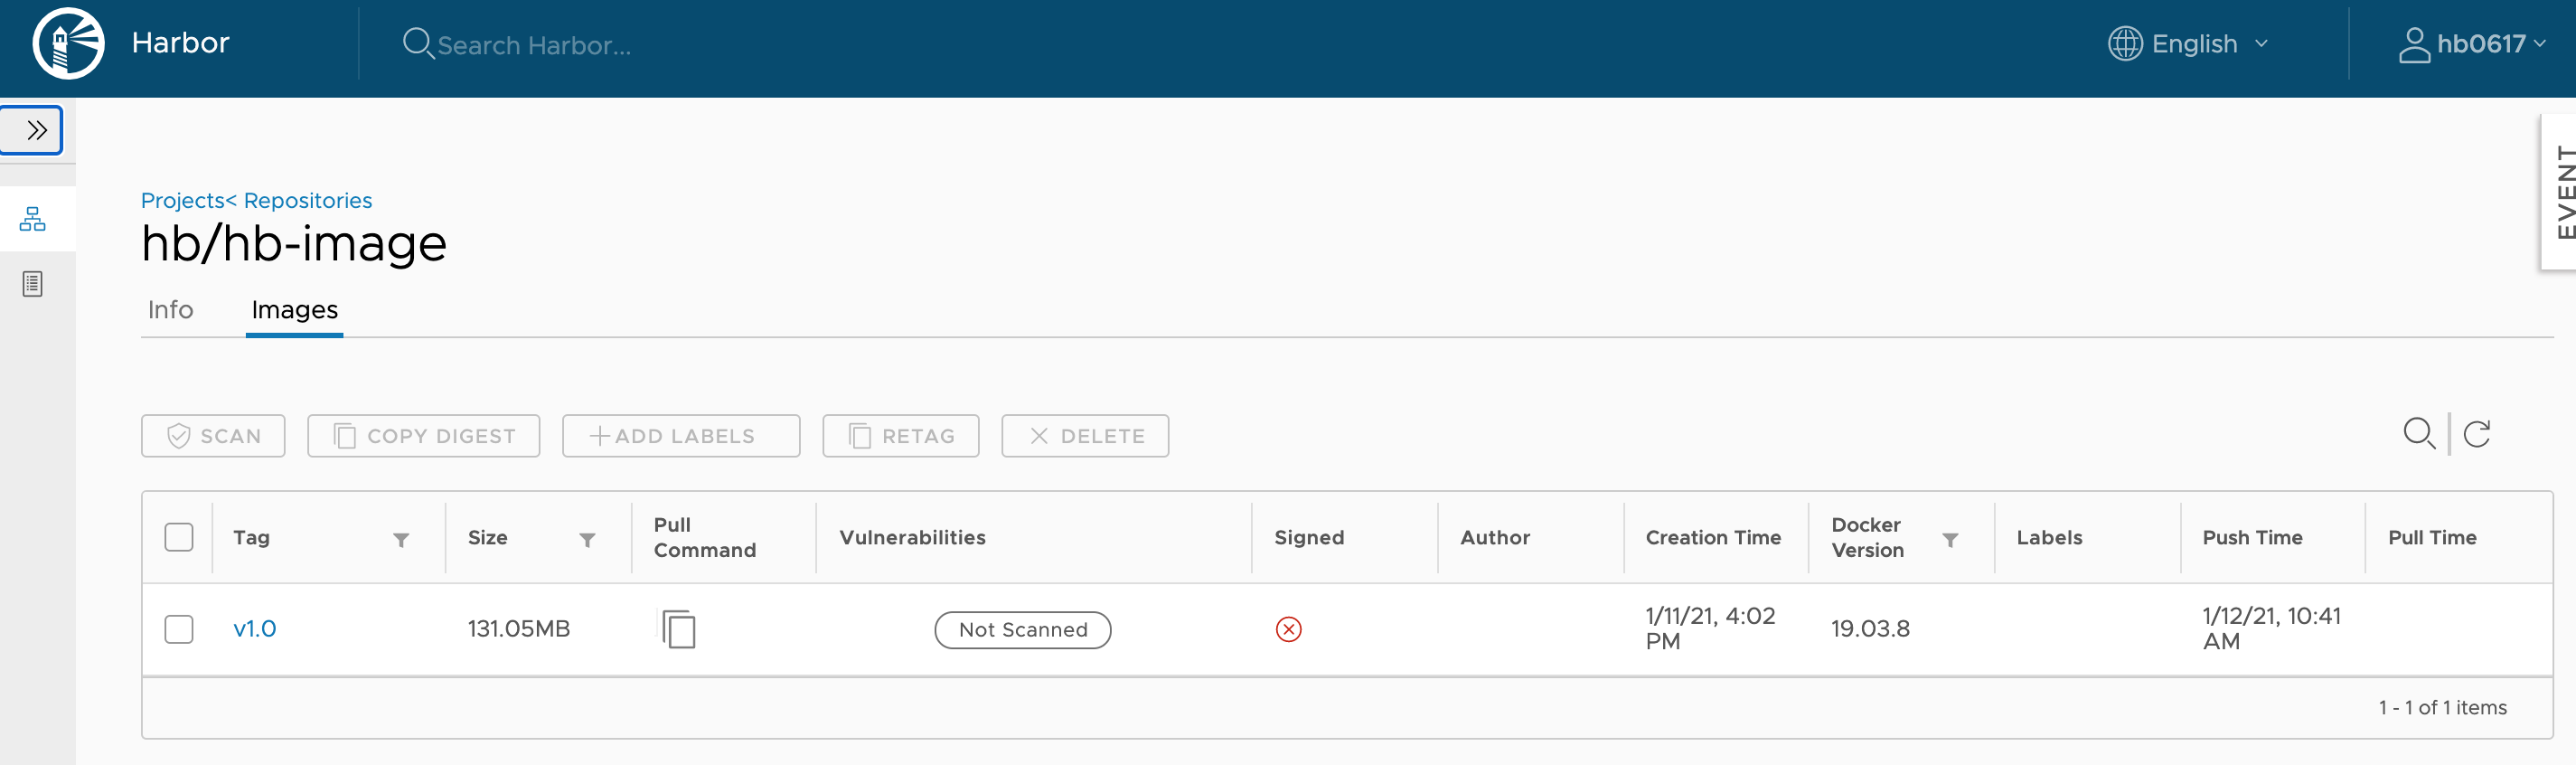
- 원격 외부 저장소에도 이미지를 저장할 수 있다.
repo.iris.tools/hb에 이미지 push
[hb0617@k8s-dev ~]$ docker login repo.iris.tools
Username: hb0617
Password:
WARNING! Your password will be stored unencrypted in /home/hb0617/.docker/config.json.
Configure a credential helper to remove this warning. See
https://docs.docker.com/engine/reference/commandline/login/#credentials-store

Login Succeeded
[hb0617@k8s-dev ~]$ docker tag hb-image:v1.0 repo.iris.tools/hb
Error response from daemon: No such image: hb-image:v1.0
[hb0617@k8s-dev ~]$ docker tag hb-image:latest  repo.iris.tools/hb
[hb0617@k8s-dev ~]$ docker tag hb-image:latest  repo.iris.tools/hb/hb-image:v1.0
[hb0617@k8s-dev ~]$ docker push repo.iris.tools/hb/hb-image:v1.0
The push refers to repository [repo.iris.tools/hb/hb-image]
29cbccbd902e: Pushed
f175327a8f10: Pushed
74a395de8e03: Pushed
d4e6e76c4a7b: Pushed
1a9c1c6ccc89: Pushed
7b1d18bfea11: Pushed
f00a65231359: Pushed
95803b58ceac: Pushed
777b2c648970: Pushed
v1.0: digest: sha256:dd8bd28a2ec6c2a65cc8de7a4ffc7bf174a34b0baf979a70f7d64e499795d7aa size: 2203
확인
Docker Compose
Docker compose는 여러개의 컨테이너 애플리케이션을 정의하고 공유할 수 있도록 개발된 도구이다. 여러개의 컨테이너를 일괄적으로 관리할 수 있다는 점에서 개념적으로는 k8s와 비슷하다.
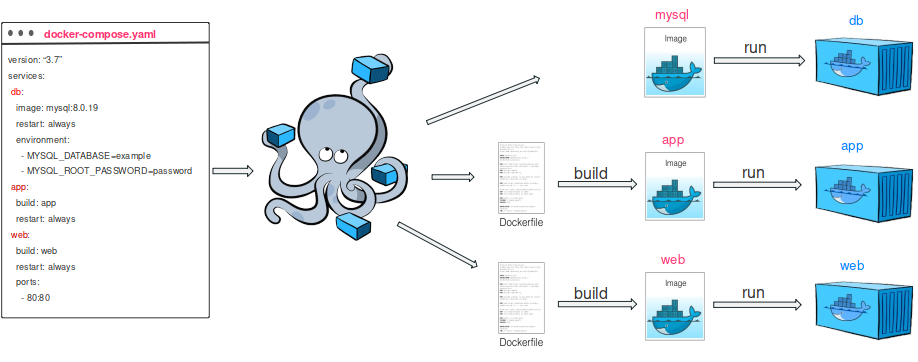
Docker-Compose.yml 라는 Docker Compose의 구성 파일로 한 파일내에 여러 컨테이너의 설정 내용(서비스, 네트워크, 볼륨 등)을 관리한다.
Docker Volume
Docker 컨테이너에 쓰여진 데이터는 기본적으로 컨테이너가 삭제될 때 함께 사라지게 된다. 그러나 Docker에서 돌아가는 많은 애플리케이션이 컨테이너의 생명주기와 관계없이 데이터를 영속적으로 저장해야하고, 많은 경우 여러개의 Docker 컨테이너가 하나의 저장공간을 공유해서 데이터를 읽거나 써야 한다.

이를 위해 Docker는 컨테이너 생명주기와 관계없이 데이터를 영속적으로 저장할 수 있도록 2가지 옵션을 제공한다.
- Docker volume(권장)
- bind mount
$ docker volume create our-vol
our-vol
$ docker volume ls
DRIVER              VOLUME NAME
local               our-vol
$ docker volume inspect our-vol
[
    {
        "CreatedAt": "2020-05-09T17:03:46Z",
        "Driver": "local",
        "Labels": {},
        "Mountpoint": "/var/lib/docker/volumes/our-vol/_data",
        "Name": "our-vol",
        "Options": {},
        "Scope": "local"
    }
]
컨테이너가 볼륨을 사용하기 위해서는 볼륨을 컨테이너에 마운트 해주어야 한다.
$ docker run -d \
-it \
--name volume-mount-test \
--mount source=our-vol,target=/app \
nginx:latest
Unable to find image 'nginx:latest' locally
latest: Pulling from library/nginx
6ec7b7d162b2: Pull complete
cb420a90068e: Pull complete
2766c0bf2b07: Pull complete
e05167b6a99d: Pull complete
70ac9d795e79: Pull complete
Digest: sha256:4cf620a5c81390ee209398ecc18e5fb9dd0f5155cd82adcbae532fec94006fb9
Status: Downloaded newer image for nginx:latest
ece55fce6d0cba080f573ced946ff218ce66c58c20358acd5db79c7c0605efcc
생성된 컨테이너의 상세 정보를 확인해보면
$ docker inspect volume-mount-test
[
    {
        "Id": "ece55fce6d0cba080f573ced946ff218ce66c58c20358acd5db79c7c0605efcc",
        "Created": "2021-01-12T00:44:15.2517721Z",
        "Path": "/docker-entrypoint.sh",
        "Args": [
            "nginx",
            "-g",
            "daemon off;"
        ],

        (생략)

        "Mounts": [
            {
                "Type": "volume",
                "Name": "our-vol",
                "Source": "/var/lib/docker/volumes/our-vol/_data",
                "Destination": "/app",
                "Driver": "local",
                "Mode": "z",
                "RW": true,
                "Propagation": ""
            }
        ],

        (생략)
]
Container 중지시키고 volume 삭제
이때, 정지된 컨테이너를 삭제해주어야 에러 없이 삭제 가능하다.
$ docker rm -f $(docker ps -a -q)
또는
$ docker docker rm -f CONATINER_ID_1 CONATAINER_ID_2 ...
6f35830fd461
de188f9bdb03

$ docker volume rm our-vol
our-vol #삭제 완료!