쿠버네티스
컨테이너화 된 애플리케이션을 자동으로 배포, 스케일링 및 관리해주는 오픈소스 시스템
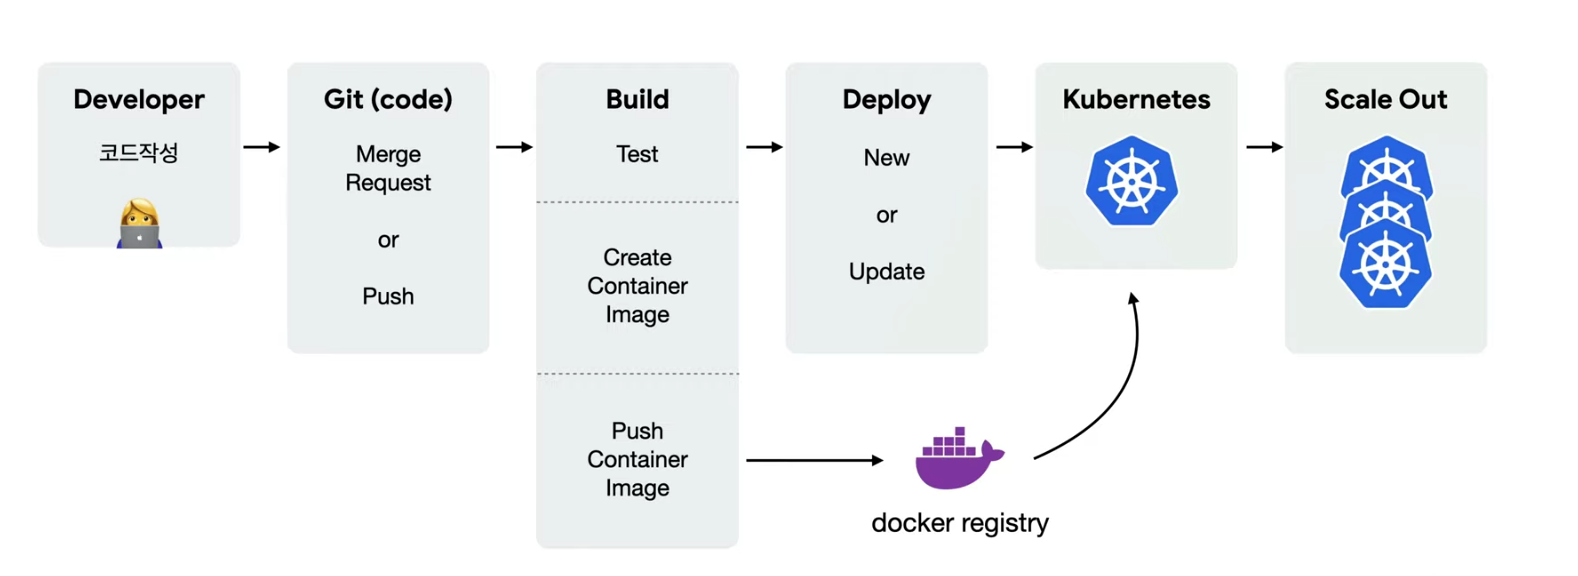
쿠버네티스는 ‘원하는 상태’를 유지하는 것이 핵심이다.
Desired State
-
상태체크(Observe)
Current State == Desired State -
차이점 발견(Diff)
Current State != Desired State -
조치(Act)
Current State => Desired State
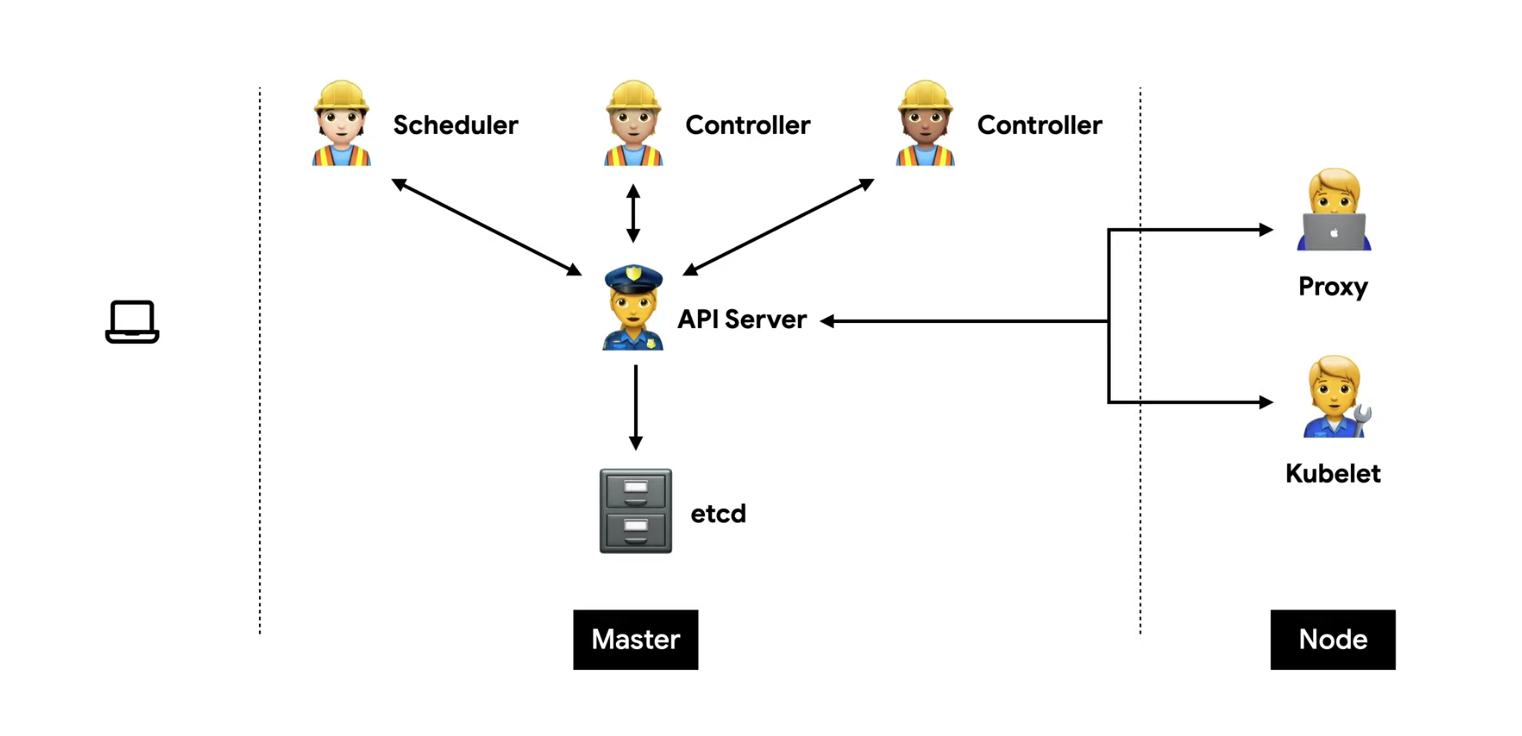
Master
etcd
모든 상태와 데이터를 저장
Key(directory)-Value 형태로 데이터 저장
API server
상태를 바꾸거나 조회
etcd와 유일하게 통신하는 모듈
REST API 형태로 제공
권한을 체크하여 적절한 권한이 없을 경우 요청을 차단
관리자 요청 뿐 아니라 다양한 내부 모듈과 통신
요청이 많으므로 수평으로 확장하도록 디자인 되어있음
Scheduler
새로 생성된 Pod를 감지하고 실행할 노드를 선택
노드의 현재 상태와 Pod의 요구사항 체크
Controller
논리적으로 다양한 컨트롤러가 존재
끊임없이 상태를 체크하고 원하는 상태를 유지
복잡성을 낮추기 위해 하나의 프로세스로 실행
Node
kubelet
직접 pod과 통신
각 노드마다 존재
Pod을 실행/중지하고 상태를 체크
proxy
네트워크 프록시와 부하 분산 역할
API 호출하기
원하는 상태(desired state)를 다양한 오브젝트(object)로 정의(spec)하고 API 서버에 yaml 형식으로 전달한다.
yml 필수 요소
apiVersion: v1
kind: Pod
metadata:
  name: echo
  labels:
    app: echo
spec:
  containers:
    - name: app
      image: ghcr.io/subicura/echo:v1
| 정의 | 설명 | 예 |
|---|---|---|
| version | 오브젝트 버전 | v1, app/v1, networking.k8s.io/v1 |
| kind | 종류 | Pod, ReplicaSet, Deployment, Service |
| metadata | 메타데이터 | name과 label, annotation(주석)으로 구성 |
| spec | 상세명세 | 리소스 종류마다 다름 |
kubectl command
기본 명령어
| 명령어 | 설명 |
|---|---|
| create | 원하는 상태 적용. 보통 -f 옵션으로 파일과 함께 사용 |
| delete | 리소스를 제거 |
| get | 리소스 목록 |
| describe | 리소스의 상태를 자세하게 보여준다. |
| logs | 컨테이너의 로그 |
| exec | 컨테이너에 접근할 때 사용. 컨테이너에 명령어를 전달. |
| config | kubectl 설정을 관리 |
[root@platform-group-k8s-1 test1]# kubectl create -f nginx-deployment.yml -n hb-test
deployment.apps/nginx created

[root@platform-group-k8s-1 test1]# kubectl delete -f wp-mysql.yml -n hb-test
deployment.apps "wordpress-mysql" deleted
service "wordpress-mysql" deleted
deployment.apps "wordpress" deleted
service "wordpress" deleted

[root@platform-group-k8s-1 test1]# kubectl get svc -n hb-test
NAME          TYPE       CLUSTER-IP     EXTERNAL-IP   PORT(S)          AGE
my-nodeport   NodePort   10.1.228.120   <none>        9000:31000/TCP   3d4h

kubectl exec [POD] -- [COMMAND]
[root@platform-group-k8s-1 test1]# kubectl exec -it myapp-pod -n hb-test -- /bin/sh
/workspace/test #
Endpoint : 서비스의 접속정보
$ kubectl describe ep/[서비스이름]
Object
Pod
Pod은 쿠버네티스에서 관리하는 가장 작은 배포 단위.
쿠버네티스와 도커의 차이점은 도커는 컨테이너를 만들지만, 쿠버네티스는 컨테이너 대신 Pod을 만든다. Pod은 한 개 또는 여러 개의 컨테이너를 포함할 수 있다.
격리된 논리공간 namespace 생성
$ kubectl create namespace hb-test
yaml 파일로 pod 생성
apiVersion: v1
kind: Pod
metadata:
  name: myapp-pod
  namespace: hb-test
  labels:
    app: myapp
spec:
  containers:
    - name: myapp-container
      image: repo.iris.tools/hb/hb-image:v1.0
실행/확인
$ kubectl create -f sample-pod.yml -n hb-test
$ kubectl get pod -n hb-test
NAME        READY   STATUS    RESTARTS   AGE
myapp-pod   1/1     Running   0          26s
$ kubectl exec -it myapp-pod -n hb-test -- /bin/sh
/workspace/test # ls
Dockerfile        go.mod            go.sum            run_my_docker.sh  test1             test1.go
ReplicaSet
Pod를 단독으로 만들면 Pod에 어떤 문제(서버가 죽어서 Pod이 사라졌다던가)가 생겼을 때 자동으로 복구되지 않는다.
이러한 Pod을 정해진 수만큼 복제하고 관리하는 것이 ReplicaSet이다.
ReplicaSet 예시
replicas opbejct에 app=nginx인 pod 3개를 정의하고 생성해준다.
apiVersion: apps/v1
kind: ReplicaSet
metadata:
  name: nginx
  namespace: hb-test
  labels:
    app: nginx
spec:
  replicas: 3
  selector:
    matchLabels:
      app: nginx
  template:
    metadata:
      labels:
        app: nginx
        tier: app
    spec:
      containers:
        - name: nginx
          image: nginx:latest
[root@platform-group-k8s-1 test1]# kubectl get pod --show-labels -n hb-test
NAME                     READY   STATUS    RESTARTS   AGE     LABELS
nginx-57796d7dff-c6z4r   1/1     Running   0          2m     app=nginx,pod-template-hash=57796d7dff
nginx-57796d7dff-kr2rh   1/1     Running   0          2m     app=nginx,pod-template-hash=57796d7dff
nginx-57796d7dff-zjjhf   1/1     Running   0          2m     app=nginx,pod-template-hash=57796d7dff
app- 옵션으로 하나의 pod의 app라벨을 제거해준다.
[root@platform-group-k8s-1 test1]# kubectl label pod/nginx-57796d7dff-c6z4r app- -n hb-test
pod/nginx-57796d7dff-c6z4r labeled
해당 pod에 대해 기존에 생성된 app 라벨이 사라지면서 selector에 정의한 app=nginx조건을 만족하는 pod의 개수가 2가 되어 이를 만족하는 pod이 하나 더 생성되었다.
[root@platform-group-k8s-1 test1]# kubectl get pod --show-labels -n hb-test
NAME                     READY   STATUS    RESTARTS   AGE     LABELS
nginx-57796d7dff-6qfzj   1/1     Running   0          10s     app=nginx,pod-template-hash=57796d7dff
nginx-57796d7dff-c6z4r   1/1     Running   0          3m      pod-template-hash=57796d7dff
nginx-57796d7dff-kr2rh   1/1     Running   0          3m      app=nginx,pod-template-hash=57796d7dff
nginx-57796d7dff-zjjhf   1/1     Running   0          3m      app=nginx,pod-template-hash=57796d7dff
Deployment
Deployment는 쿠버네티스에서 가장 널리 사용되는 오브젝트이다.
ReplicaSet을 이용하여 Pod를 업데이트하고 이력을 관리하여 Rollback하거나 특정버전으로 돌아갈 수 있다.
ReplicaSet에서 사용했던 파일에 kind만 바꿔주고 실행해준다.
apiVersion: apps/v1
kind: Deployment
metadata:
  name: nginx
  namespace: hb-test
  labels:
    app: nginx
spec:
  replicas: 3
  selector:
    matchLabels:
      app: nginx
  template:
    metadata:
      labels:
        app: nginx
        tier: app
    spec:
      containers:
        - name: nginx
          image: nginx:1.14.2
[root@platform-group-k8s-1 test1]# kubectl create -f nginx-deployment.yml -n hb-test
deployment.apps/nginx created
[root@platform-group-k8s-1 test1]# kubectl get po,rs,deploy -n hb-test
NAME                         READY   STATUS    RESTARTS   AGE
pod/nginx-5f6587f7f8-2fchs   1/1     Running   0          14s
pod/nginx-5f6587f7f8-cmwq6   1/1     Running   0          15s
pod/nginx-5f6587f7f8-xnm6d   1/1     Running   0          14s

NAME                               DESIRED   CURRENT   READY   AGE
replicaset.apps/nginx-5f6587f7f8   3         3         3       15s

NAME                    READY   UP-TO-DATE   AVAILABLE   AGE
deployment.apps/nginx   3/3     3            3           15s
이제 기존 설정에서 이미지 태그만 바꿔주고 다시 적용해준다.
[root@platform-group-k8s-1 test1]# kubectl set image deployment/nginx nginx=nginx:1.16.1 --record  -n hb-test
deployment.apps/nginx image updated
기존 3개의 pod이 terminating 되고 3개가 새로 생긴다.
[root@platform-group-k8s-1 test1]# kubectl get po,rs,deploy -n hb-test
NAME                         READY   STATUS    RESTARTS   AGE
pod/nginx-757bd75865-7fcq8   1/1     Running   0          19s
pod/nginx-757bd75865-8xznf   1/1     Running   0          16s
pod/nginx-757bd75865-gjbl9   1/1     Running   0          39s

NAME                               DESIRED   CURRENT   READY   AGE
replicaset.apps/nginx-5f6587f7f8   0         0         0       2m16s
replicaset.apps/nginx-757bd75865   3         3         3       39s

NAME                    READY   UP-TO-DATE   AVAILABLE   AGE
deployment.apps/nginx   3/3     3            3           2m16s
Service
Pod는 자체 IP를 가지고 다른 Pod와 통신할 수 있지만, 쉽게 사라지고 생성되는 특징 때문에 직접 통신하는 것을 권장하지 않는다. 대신 별도의 고정된 IP를 가진 Service를 만들고 그 서비스를 통해 Pod에 접근하는 방식을 사용한다.
이때 이 Service는 노출범위에 따라 ClusterIP, NodePort, LoadBalancer로 나뉘어진다.
ClusterIP

ClusterIP는 클러스터 내부에 새로운 서비스의 고유 IP를 할당하고 여러개의 Pod를 바라보는 로드밸런서 기능을 제공한다. 따라서 이 IP는 k8s 클러스터 내에서만 접근이 가능하다. 또한 Pod를 여러개 연결 할 수 있고 트래픽을 분산해서 Pod에 전달해준다.
NodePort
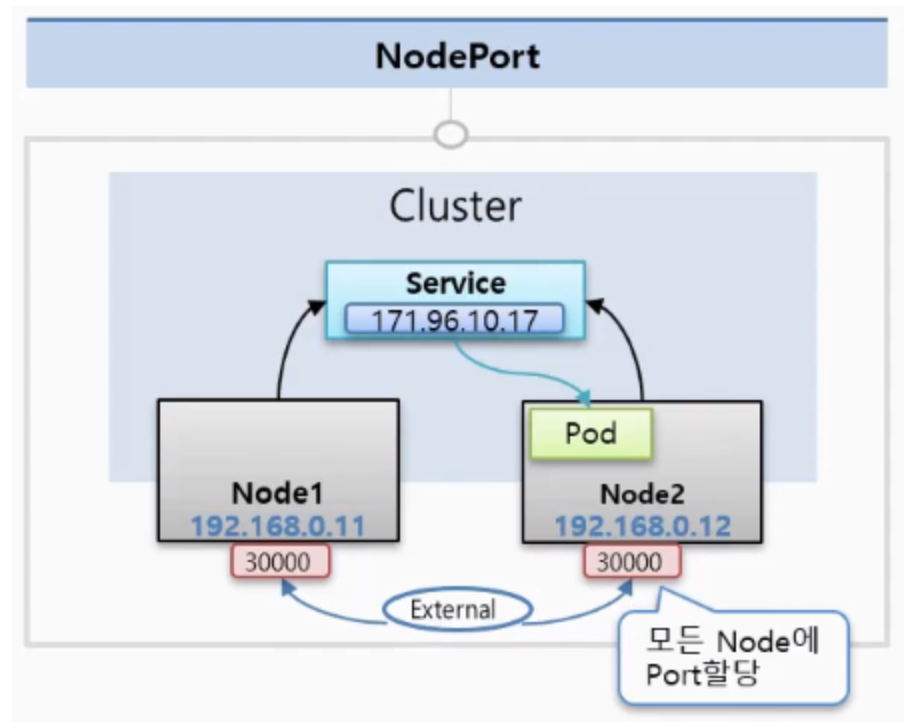
NodePort는 k8s 클러스터에 연결되어 있는 모든 Node에게 똑같은 Port가 할당이 되어서 외부로부터 어느 Node던간에 그 IP의 포트로 접속을 하면 해당 Service에 연결이 되고, 이 Servcie는 자신에 연결되어 있는 Pod에 트래픽을 전달해준다.
(NodePort는 CluterIP의 기능을 기본으로 포함.)
Load Balancer
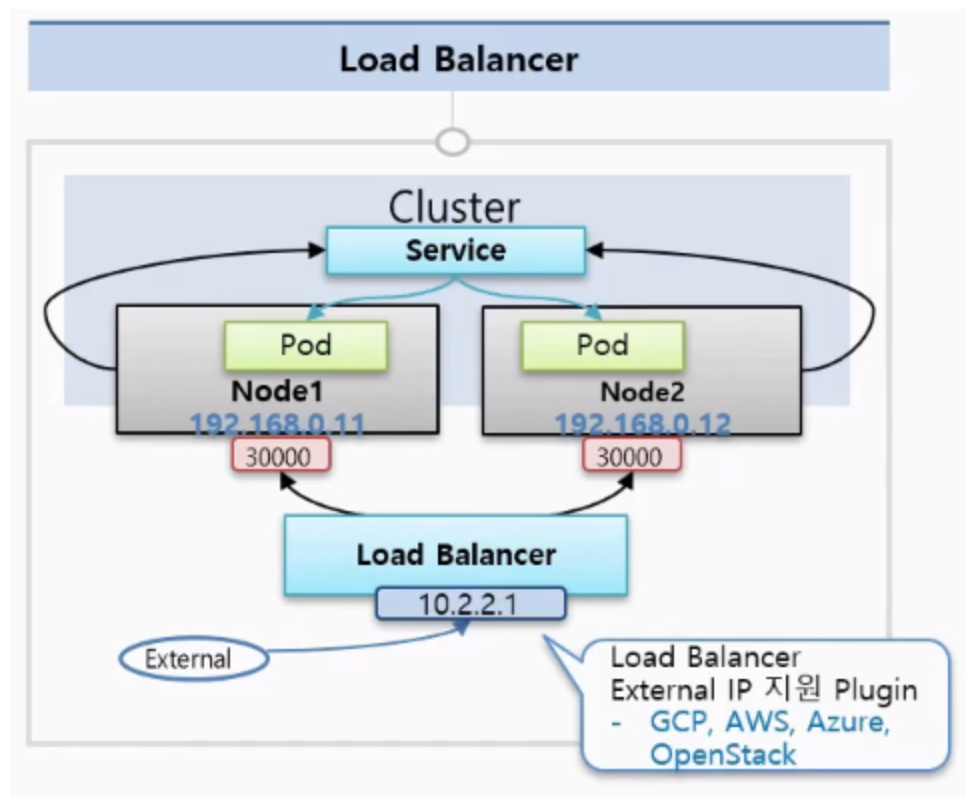
NodePort는 노드가 사라졌을때 자동으로 다른 노드를 통해 접근이 불가능하다. 자동으로 살아있는 노드에 접근하기 위해서는 모든 노드를 바라보는 Load Balancer가 필요하다.
(LoadBalancer는 NodePort의 기능을 기본으로 포함.)
Service 실습 - Pod을 외부에 노출시키기
NodePort를 이용해서 외부에서 접속할 수 있도록 해보자.
sample-pod.yml
apiVersion: v1
kind: Pod
metadata:
  name: myapp-pod
  namespace: hb-test
  labels:
    app: helloApp
spec:
  containers:
     - name: myapp-container
       image: repo.iris.tools/hb/hb-image:v1.0
       ports:
          - containerPort: 1322
            protocol: TCP
이전에 작성한 pingpong 서버의 포트번호가 1322였으므로 여기서도 pod의 포트번호를 1322로 맞춰준다.
my-nodeport.yml
apiVersion: v1
kind: Service
metadata:
  name: my-nodeport
spec:
  type: NodePort
  ports:
    - port: 9000
      targetPort: 1322
      nodePort: 31000
  selector:
    app: helloApp
targetPort는 nodeport service가 찾아갈 pod의 포트번호 1322로 지정해준다.
실행
$ kubectl create -f sample-pod.yml
$ kubectl create -f my-nodeport.yml

$ kubectl get all -n hb-test
NAME               READY   STATUS    RESTARTS   AGE
pod/myapp-pod   1/1     Running   0          52m

NAME                  TYPE       CLUSTER-IP     EXTERNAL-IP   PORT(S)          AGE
service/my-nodeport   NodePort   10.1.158.241   <none>        9000:31000/TCP   48m
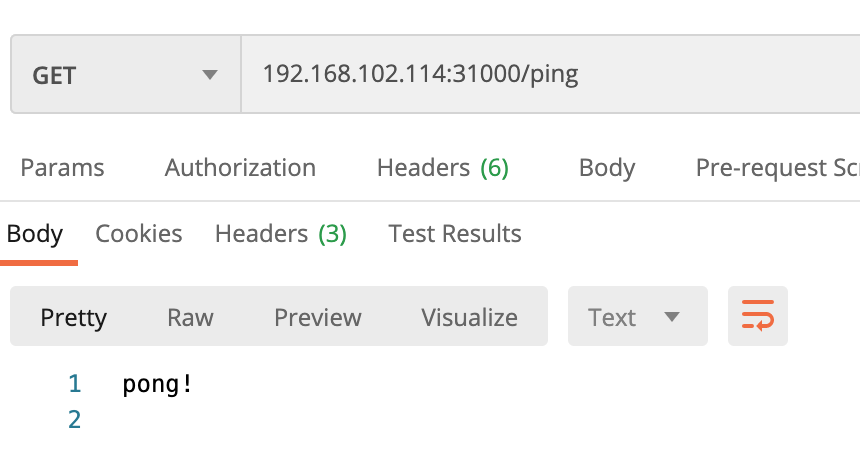
노드의 공용 ip를 확인해서(ifconfig)
node의 ip:nodeport 로 GET 요청 날리기
$ curl 192.168.102.114:31000/ping
pong!
헷갈리는 개념 정리해보기
apiVersion: apps/v1
kind: Deployment
metadata: #1
  name: nginx
  labels:
    app: nginx
    tier: backend
spec:
  selector: #2
    matchLabels:
      app: nginx
  template: #3
    metadata:
      labels:
        app: nginx
        tier: backend
...
metadata와 selector와 template에 관하여
먼저, 맨 위의 metadata(#1)는 deployment그 자체에 대한 설명이다. 따라서 이 deployment를 지우고 싶으면 아래 명령어로 지울 수 있다.
kubectl delete -l app=nginx,tier=backend
selector(#2)는 해당 Pods을 deployment와 연결(link)해 준다.
template(#3)은 podTemplate 이다. 이 부분에서는 실행되는 pod에 대해 기술한다. 따라서 이 부분에 쓰여지는 label은 해당 deployment가 아니라 실행되는 pod에 대한 label이다.
따라서 #2와 #3은 같아야한다.
그림출처
https://www.youtube.com/watch?v=Ia8IfowgU7s
https://dev-youngjun.tistory.com/20